PenalunWil
Contributor
- Joined
- Dec 30, 2013
- Messages
- 115
I appreciate that there are a lot of examples of this in the forums and may be I'm heaping coals onto an already burning fire, but I've written this as an aid to myself and to help me if I have to do it again at some point in the future.
First things first don’t use the DOS prompt instructions for flashing the LSI’s firmware. It is far easier using the UEFI shell method. If your not familiar with the UEFI shell then go back and read up about your Supermicro motherboard and how to use IPMI view. So it is very important to enter the Supermicro’s BIOS set up and change the boot options to the UEFI built in shell. This will direct you to UEFI shell when you turn off and re-boot the Supermicro motherboard. Also before you start make sure that “Watchdog” and “XHC1” in your Motherboard BIOS is disabled.
To continue you will need to get the LSI SAS address for your motherboard. Restart your Supermicro motherboard and when you see the LSI prompt “LSI Corporation” press “control-C” on your keyboard (all of this can be done from the IPMI GUI). Press “control-C” and you should see “starting configuration utility”. Here you can also see what firmware is currently running and in what mode. Mine is version P20.00.20.00 in raid IT.
You can now press enter and this will show you the SAS address which should look a little like this > 50030480:119C8300.
Next disconnect all the hard drives from the motherboard’s LSI 2308 raid controller just to be on the safe side. Make sure you note which cable goes where. Get a permanent marker and write the SATA Mobo connection on the cable, or note your hard drives order and mark the cables in their correct order. It would also be prudent to make sure you have backed up your all your data and config files etc as recommended in the FreeNAS manual.
Next format a USB stick/flashdrive in FAT32 ready for the firmware.
Using a web browser ( from another computer if you want) go to ftp://ftp.supermicro.com/Driver/SAS/LSI/2308/Firmware/IT and download the latest version of this firmware to a previously prepared file on that computer and extract the ZIP contents to here. Insert your USB stick/flashdrive into this computer and copy the contents of the UEFI file onto it. This should include a file/programme called SMC2308T.NSH
With the firmware safely on the USB stick remove it from the computer and insert it into one of the USB sockets on your Supermicro motherboard. Then start up your motherboard and enter/press F11 and enter the UEFI shell if you haven’t already done so. You should see the USB stick/flashdrive “fso”. If not power down and power up the motherboard again.
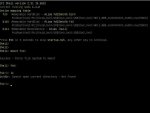
From this position you should be able to flash the firmware by typing - shell> SMC2308T.NSH and then press enter. The programme will start to run and when it has completed it will ask for the last nine numbers and letters of your SAS address which you should type in and then press enter.
On completion of the update or flash you can re-enter the motherboards LSI by pressing “control-C” on boot up and checking that the firmware has actually up-dated and in the correct mode. If you’re happy you should then enter the motherboard’s BIOS again and change the boot order back to the FreeNAS device in order for the host to start up. Further re-connect all your hard drives in their proper original order.
Finally re-boot your motherboard and your FreeNAS should be up and running with your new firmware.
First things first don’t use the DOS prompt instructions for flashing the LSI’s firmware. It is far easier using the UEFI shell method. If your not familiar with the UEFI shell then go back and read up about your Supermicro motherboard and how to use IPMI view. So it is very important to enter the Supermicro’s BIOS set up and change the boot options to the UEFI built in shell. This will direct you to UEFI shell when you turn off and re-boot the Supermicro motherboard. Also before you start make sure that “Watchdog” and “XHC1” in your Motherboard BIOS is disabled.
To continue you will need to get the LSI SAS address for your motherboard. Restart your Supermicro motherboard and when you see the LSI prompt “LSI Corporation” press “control-C” on your keyboard (all of this can be done from the IPMI GUI). Press “control-C” and you should see “starting configuration utility”. Here you can also see what firmware is currently running and in what mode. Mine is version P20.00.20.00 in raid IT.
You can now press enter and this will show you the SAS address which should look a little like this > 50030480:119C8300.
Next disconnect all the hard drives from the motherboard’s LSI 2308 raid controller just to be on the safe side. Make sure you note which cable goes where. Get a permanent marker and write the SATA Mobo connection on the cable, or note your hard drives order and mark the cables in their correct order. It would also be prudent to make sure you have backed up your all your data and config files etc as recommended in the FreeNAS manual.
Next format a USB stick/flashdrive in FAT32 ready for the firmware.
Using a web browser ( from another computer if you want) go to ftp://ftp.supermicro.com/Driver/SAS/LSI/2308/Firmware/IT and download the latest version of this firmware to a previously prepared file on that computer and extract the ZIP contents to here. Insert your USB stick/flashdrive into this computer and copy the contents of the UEFI file onto it. This should include a file/programme called SMC2308T.NSH
With the firmware safely on the USB stick remove it from the computer and insert it into one of the USB sockets on your Supermicro motherboard. Then start up your motherboard and enter/press F11 and enter the UEFI shell if you haven’t already done so. You should see the USB stick/flashdrive “fso”. If not power down and power up the motherboard again.
From this position you should be able to flash the firmware by typing - shell> SMC2308T.NSH and then press enter. The programme will start to run and when it has completed it will ask for the last nine numbers and letters of your SAS address which you should type in and then press enter.
On completion of the update or flash you can re-enter the motherboards LSI by pressing “control-C” on boot up and checking that the firmware has actually up-dated and in the correct mode. If you’re happy you should then enter the motherboard’s BIOS again and change the boot order back to the FreeNAS device in order for the host to start up. Further re-connect all your hard drives in their proper original order.
Finally re-boot your motherboard and your FreeNAS should be up and running with your new firmware.